Chapter 1.1
Verified · Sandbox workflow verified · Live cutover pending
Connect a Stripe account to the Jetpack CRM Invoicing Pro payment flow used by MBOS, verify it safely in a Stripe sandbox, and prepare the production cutover.
Navigate: Stripe Dashboard → Sandbox → Workbench → Webhooks; WordPress → Jetpack CRM → CRM Settings → Payments
Payment ownership: Stripe processes the card payment. Jetpack CRM Invoicing Pro creates the Stripe Checkout session and records the resulting invoice/transaction state. MBOS presents and orchestrates the customer workflow; it does not need a separate Stripe key for this documented payment path.
What do I need before I start?
- A Stripe account owned by the business.
- A WordPress site running Jetpack CRM with Invoicing Pro available.
- HTTPS/SSL working on the customer-facing invoice site.
- Access to Stripe Sandbox/Test mode and the WordPress administrator dashboard.
Do not enable both Stripe Connect and the Invoicing Pro Stripe API integration. Jetpack CRM documents these as separate Stripe workflows that can conflict if used at the same time.
1. Complete Stripe account activation
- After creating the Stripe account, sign in to the Stripe Dashboard.
- Complete Stripe’s required business, identity, representative, and payout information.
- Add the business bank account Stripe will use for payouts when prompted.
- If Stripe displays a review-in-progress notice, allow the review to complete before treating the account as ready for live payments. You can continue the sandbox configuration while the review is pending.
2. Switch to a Stripe sandbox
- Open the Stripe account/workspace menu.
- Choose Switch to sandbox and open the business test sandbox/Test mode.
- Confirm Stripe displays the sandbox banner stating that no real transactions will be processed.
Keep sandbox and live credentials separate. Sandbox keys start with
pk_test_andsk_test_. Live keys start withpk_live_andsk_live_. A webhook signing secret starts withwhsec_and is separate from the API keys.
3. Find the Jetpack CRM Stripe settings and webhook URL
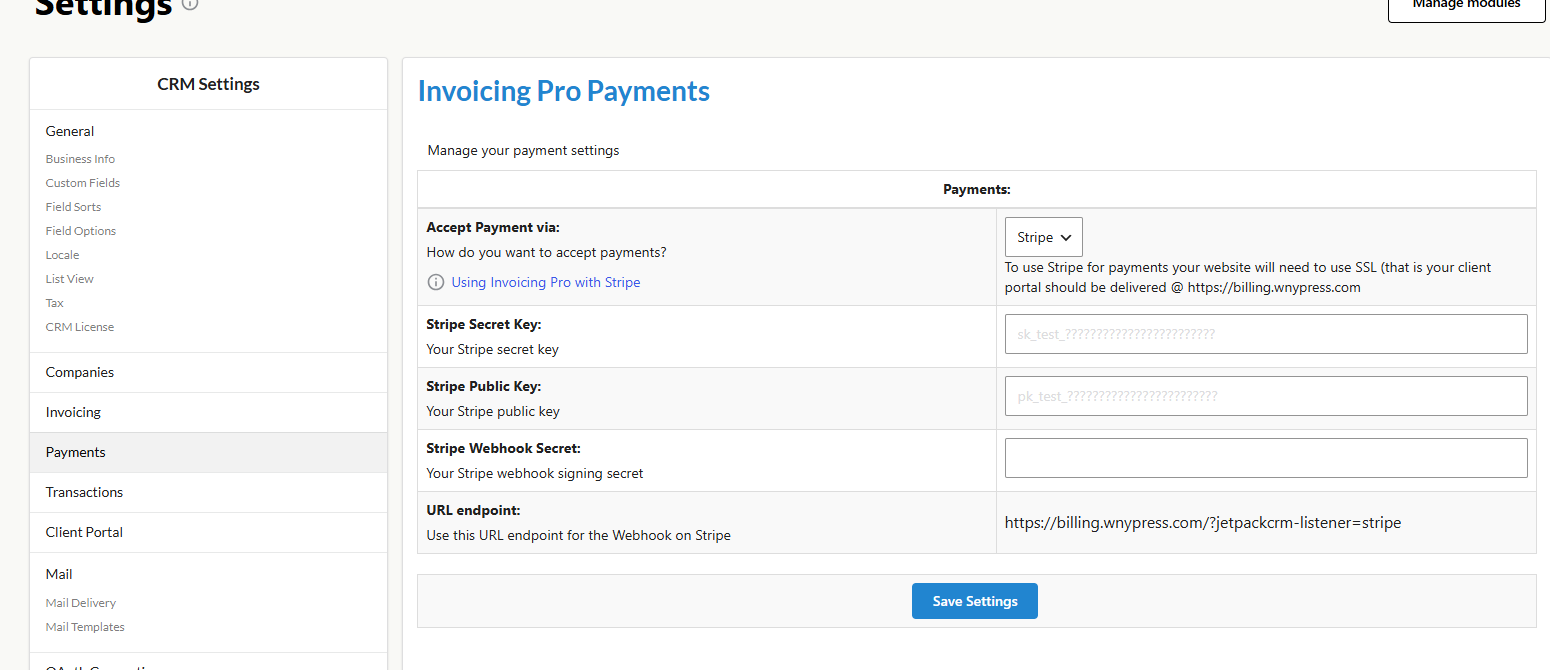
- In WordPress, open Jetpack CRM → CRM Settings → Payments.
- Choose Stripe under Accept Payment via.
- If needed, click Save Settings once so the Stripe fields appear.
- Locate the URL endpoint shown by Jetpack CRM. It normally follows this pattern:
https://your-business-domain.com/?jetpackcrm-listener=stripe. - Copy the URL generated by the customer’s own site. Do not copy the WNYPress demonstration URL from the screenshot into a customer installation.
4. Create the Stripe sandbox webhook
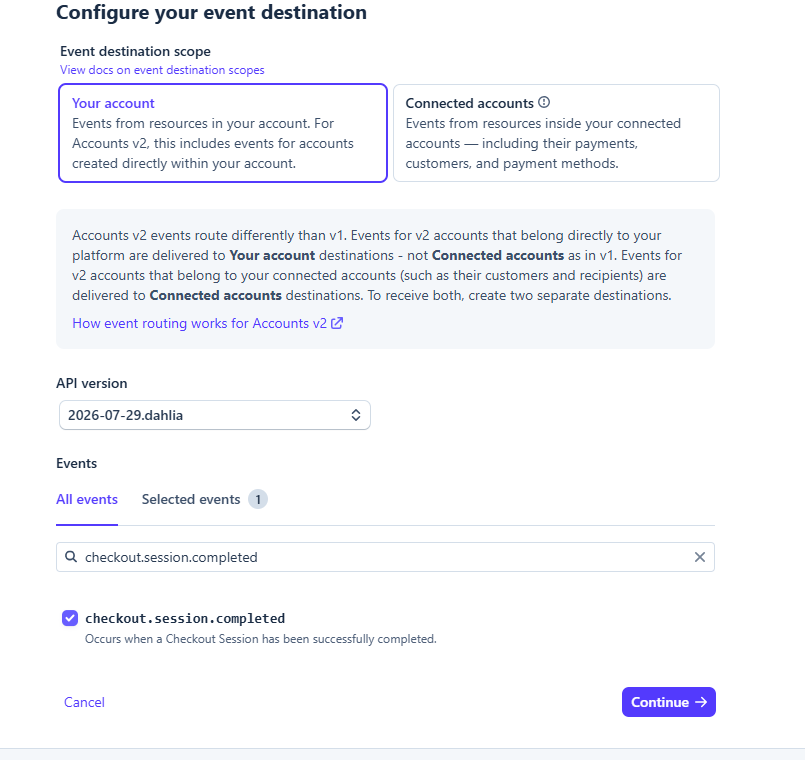
- In the Stripe sandbox, open Workbench → Webhooks and choose Add destination. Older Stripe interfaces may label this action Add endpoint.
- For the event destination scope, choose Your account.
- Leave the API version on the Stripe account’s current/default value unless the installed integration explicitly requires another version.
- Search for and select only
checkout.session.completed. - Continue and choose Webhook endpoint as the destination type.
- Paste the URL endpoint copied from Jetpack CRM.
- Add a helpful description, such as Jetpack CRM Invoicing Pro – Sandbox, then create the destination.
checkout.session.completed for the Jetpack CRM payment callback.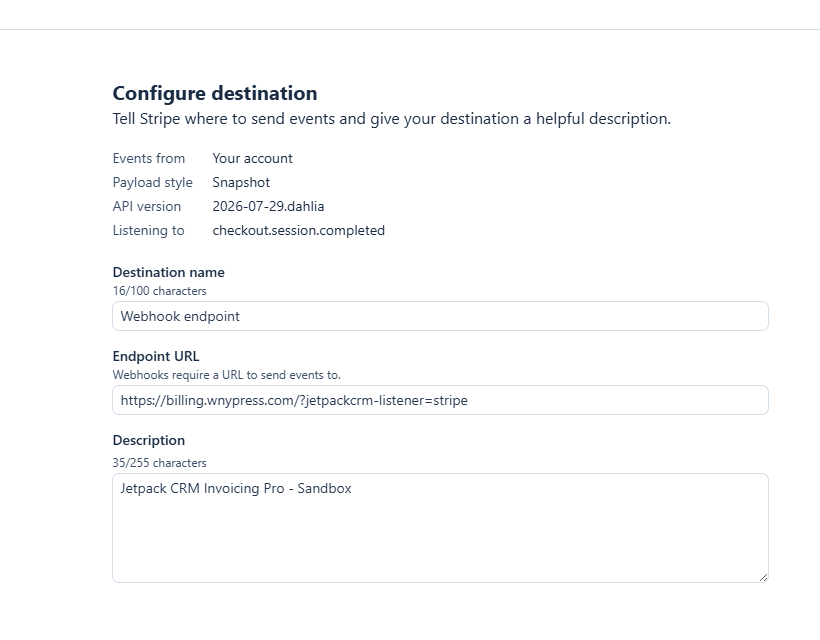
5. Save the Stripe sandbox credentials in Jetpack CRM
- In Stripe Sandbox, open Developers → API keys.
- Copy the sandbox Secret key beginning with
sk_test_. - Copy the sandbox Publishable key beginning with
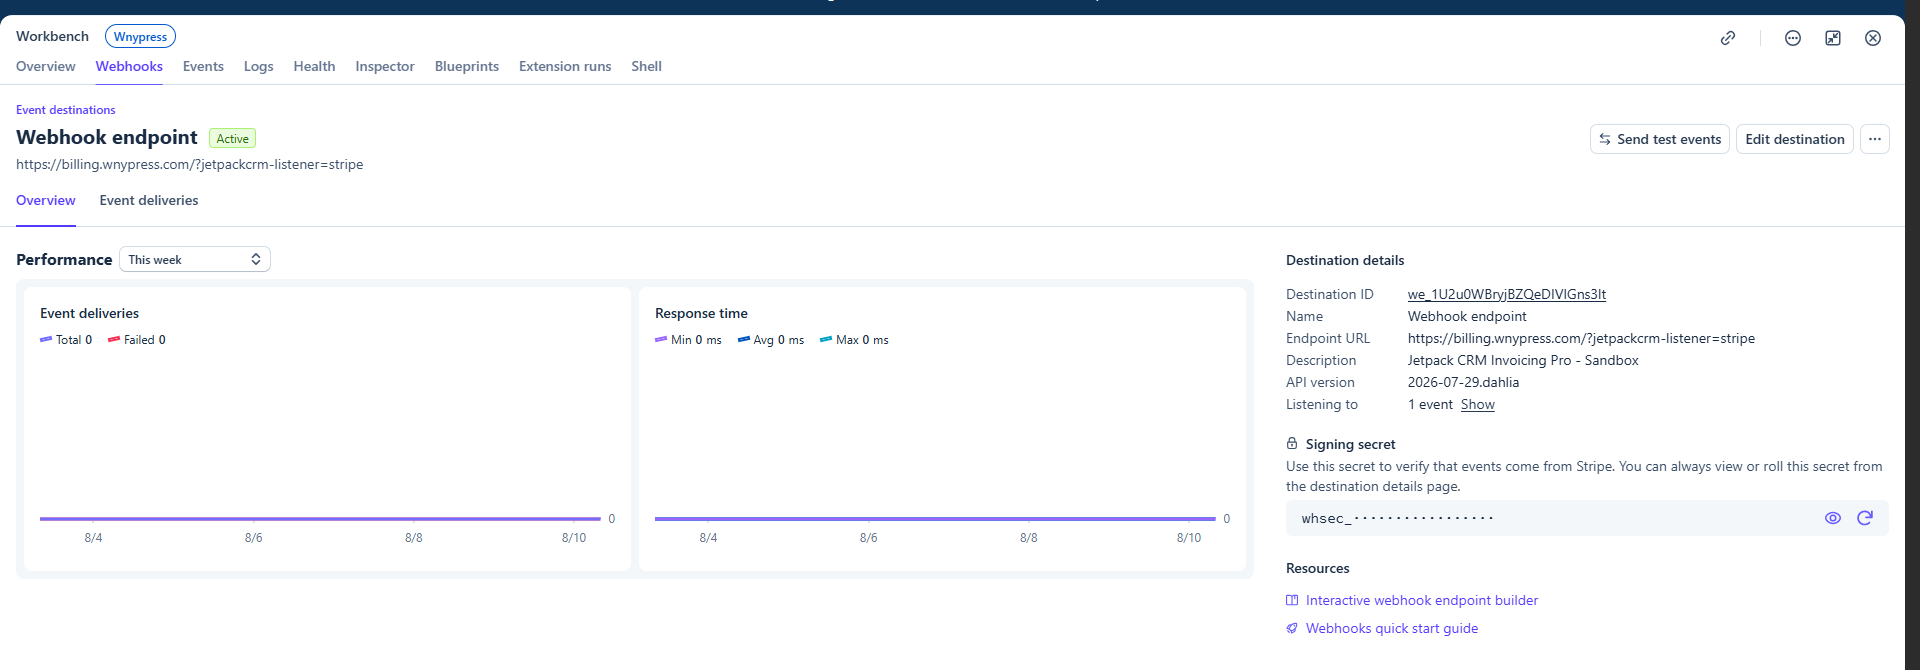
pk_test_. - Open the newly created Stripe webhook destination and reveal/copy its signing secret beginning with
whsec_. - Return to Jetpack CRM → CRM Settings → Payments.
- Paste the values into Stripe Secret Key, Stripe Public Key, and Stripe Webhook Secret.
- Click Save Settings.
Credential safety: Never place an
sk_orwhsec_value in screenshots, email, chat, documentation, source control, or public code. If a secret is exposed, rotate it before continuing. Stripe generally recommends restricted keys when an integration supports them, but this verified Invoicing Pro workflow follows Jetpack CRM’s documented Secret Key/Public Key/Webhook Secret fields. Do not invent a restricted-key permission set without proving compatibility with the installed Invoicing Pro version.
6. Test the payment flow with a sandbox invoice
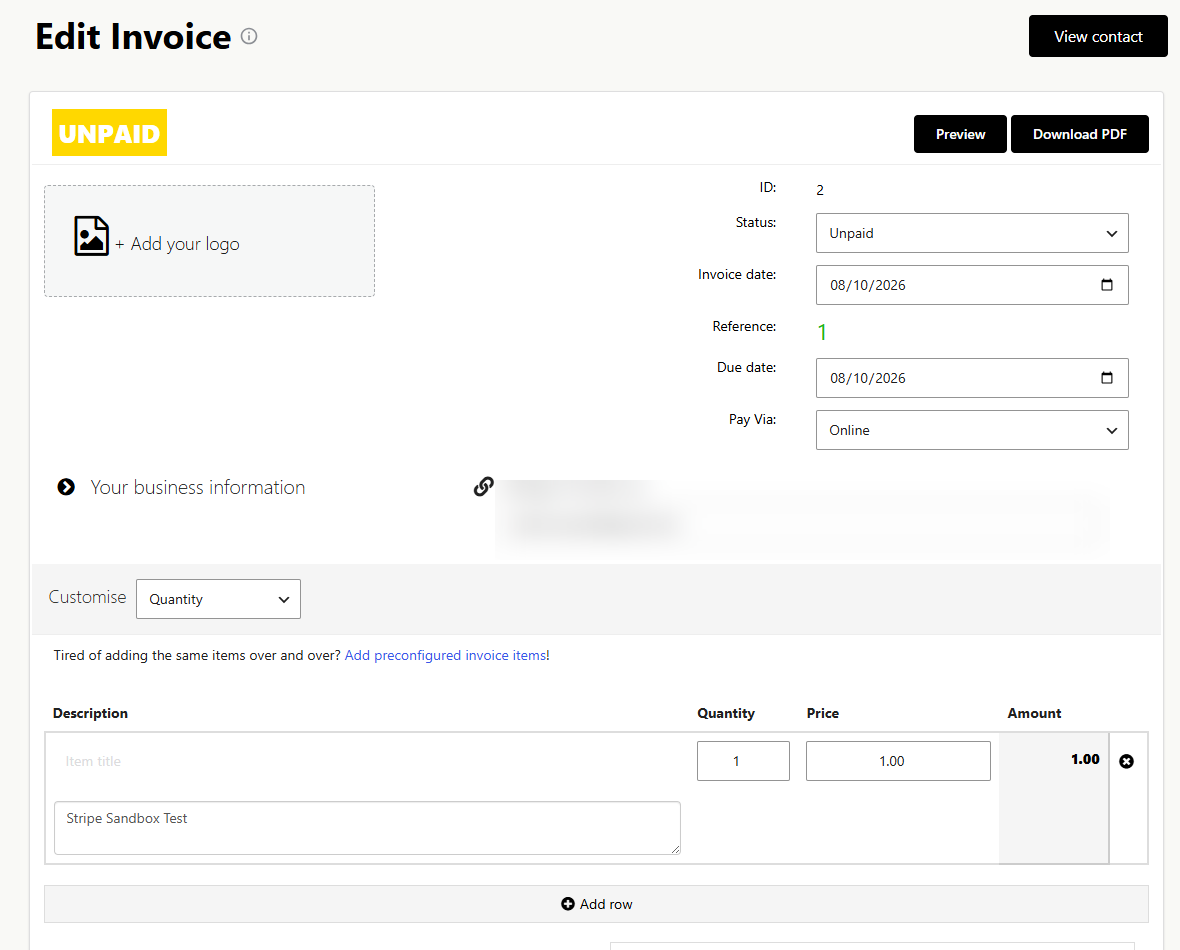
- Go to Jetpack CRM → Invoices → Add New Invoice.
- Assign the invoice to a test contact you control.
- Add a clearly labeled test line item, such as Stripe Sandbox Test, for a small amount such as $1.00.
- Set the invoice to Unpaid, choose Online payment, and save/update the invoice.
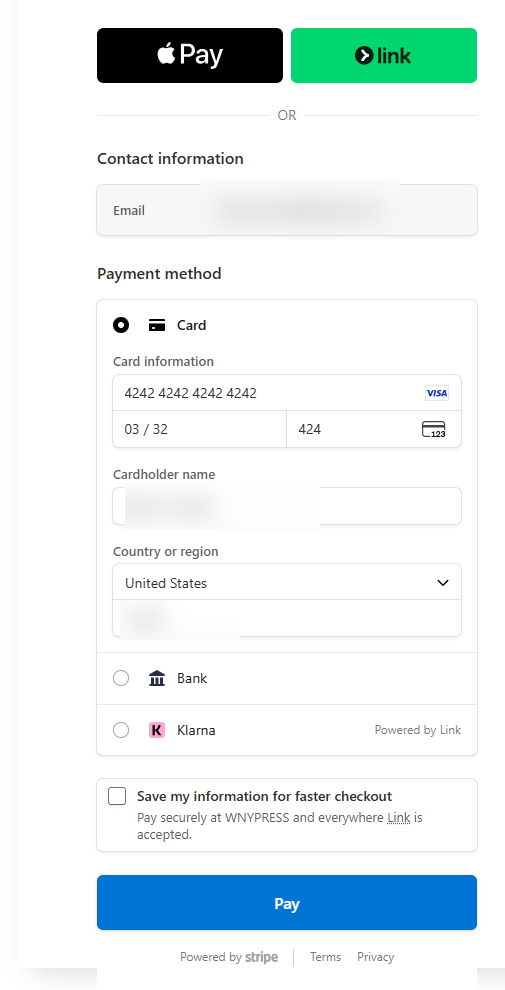
- Open the customer-facing invoice and click Pay Now. Stripe Checkout should open with a visible Sandbox indicator.
- Use Stripe’s successful test card
4242 4242 4242 4242, any future expiration date, any three-digit CVC, and a valid test postal code. - Submit the payment.
7. Verify the successful transaction and webhook
- Confirm the customer is returned from Stripe after payment.
- Confirm the payment appears in the customer transaction history with status Succeeded.
- Confirm Jetpack CRM applies the transaction to the test invoice and the invoice reaches Paid status.
- In Stripe Sandbox → Workbench → Webhooks → the Jetpack CRM destination, review Event deliveries and confirm the
checkout.session.completeddelivery succeeds.
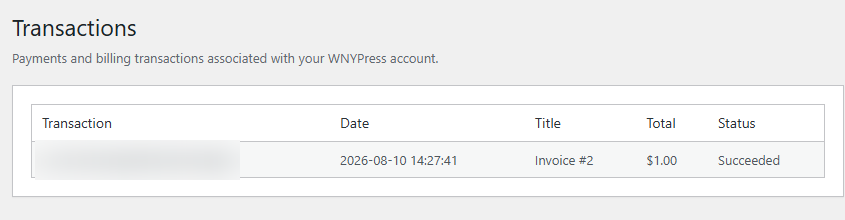
Verified result: The documented WNYPress test completed the path Jetpack CRM invoice → Pay Now → Stripe Sandbox Checkout → successful payment → Jetpack CRM transaction record.
8. Switch the payment gateway to live mode
Complete this phase only after the Stripe account is approved for the required live payment capabilities and the business has authorized production payments.
- Switch from the Stripe sandbox to Live mode.
- Copy the live publishable key (
pk_live_…) and live secret key (sk_live_…) and store them securely. - Create or confirm the live-mode webhook endpoint using the business site’s Jetpack CRM endpoint URL and the
checkout.session.completedevent. - Copy the live webhook signing secret. Do not reuse the sandbox signing secret.
- Replace the three sandbox values in Jetpack CRM → CRM Settings → Payments with their live counterparts and save.
- Perform a controlled live-payment verification only after launch approval.
Live cutover status: The sandbox workflow above was verified end to end. The production/live credential cutover should be re-verified on the deployed customer installation before accepting customer payments.
Why is this useful?
This configuration lets a customer pay an MBOS/Jetpack CRM invoice through Stripe Checkout while keeping Stripe as the payment processor and Jetpack CRM as the invoice and transaction system of record.
How do I verify the complete setup?
- Stripe sandbox payment succeeds.
checkout.session.completedreaches the Jetpack CRM webhook.- Jetpack CRM records the transaction and applies it to the correct invoice.
- No sandbox credential remains in Jetpack CRM after live cutover.
- No secret key or webhook signing secret appears in documentation, screenshots, logs, or source control.
- Stripe Connect is not enabled alongside the Invoicing Pro Stripe API integration.